|
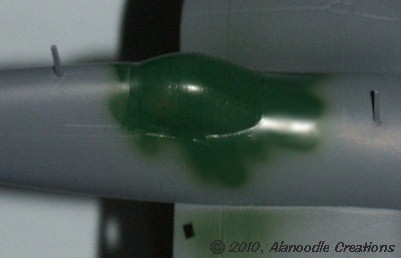
Before applying
the plane's main color, the canopy straps were airbrushed with the same
Park Green, Flat Black mix used on the interior of the cockpit. Once
the
main color was sprayed on, the insides of the straps would be dark
green
and the outside would be the color of the fuselage.
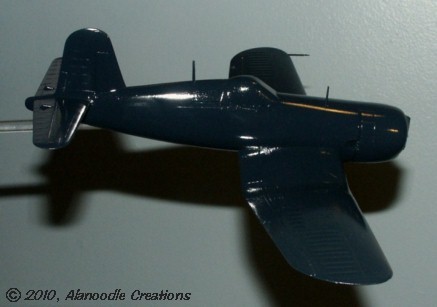
According to
the reference sheet that came with Impact Hobby's decal set, postwar
Corsairs
of the U.S.M.C. VMF-225 Squadron were painted overall "dark sea blue."
A 4:1 mix of Tamyia's Sea Blue (XF-17) and Blue (X-4) was very close to
the color of a Corsair in an image taken in 1946, below. The paint was
thinned with denatured alcohol and sprayed on using a Testors mini
spray
gun. Two coats covered the model.
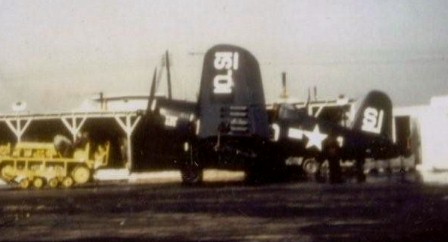
Image courtesy Dave
Gorman
|
|

|
One
thing I love
about this hobby is the continuing opportunity to try new techniques,
materials
and media. At the same time, I have a bad habit of just diving in
without
doing any kind of testing or experimenting on scrap material to see how
a new technique, material or medium will behave or turn out. The model
I happen to be working on at the time winds up becoming my test piece.
This can add an element of adventure to a modeling project.
To
prep for
decals, the painted model was sprayed with Pledge Future
acrylic
floor polish to provide a high gloss finish. Modeling magazine
articles
have often mentioned clear coating models with Future and it
was
something I had wanted to try.
Using the Testors
mini spray gun, Future was sprayed on full strength with the
regulator
on my compressor set at about 25psi and the paint setting on the spray
gun set at medium-low. The Future covered very quickly on one
pass
and no second coat was needed.
|
After spraying, the entire surface of the model was
covered with what appeared to be a thin layer of foam. I learned later
on that the air pressure to the spray gun was likely too
high. To my relief, the foam settled out after about 5 minutes.
A couple of runs and puddles were wicked away using the edge of a paper towel.
When the Future
finally dried, it had leveled out and left the model with a beautiful,
glossy and very even finish ideal for the application of decals.
|
|
|
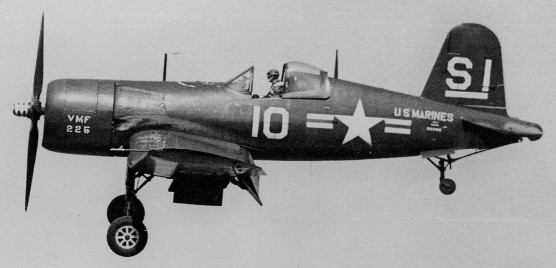
Image courtesy Dave Gorman
|
I wanted to build a model that was historically accurate and hoped it
might
be possible to replicate a plane in my father's squadron, USMC
VMF-225.
A Google search surprised me.
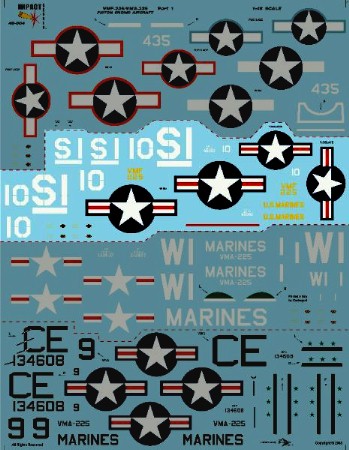
Impact Hobby sells a decal sheet that has markings for 5 separate
planes
comprising the piston engine aircraft of the Marine Corps VMF-225
squadron.
These range from the Vought F4U Corsairs of World War Two to the
Douglas
A-1H Skyraiders of the Korean conflict.
The sheet includes markings for F4U-4 Corsair, bureau number 96082
which
was stationed on the aircraft carrier U.S.S. Siboney at the same time
that
my father was stationed on board.
The decal sheet, with artwork by JDMC Aviation Graphics is beautifully
printed in 7 colors by Cartograf of Italy. The markings include
everything
from the prominent "Star and Bar" insignia on the fuselage and wings to
the safety labels on the plane's propellers. The sheet can be purchased
directly from Impact
Hobby Decals.
The markings on the decal sheet were extensively researched with the
only
issue being the "U.S. MARINES" and the "VMF 225" markings which were
printed
in yellow instead of white. Impact Hobby caught this error and includes
an additional sheet with the markings in their correct white color.
|
|
|
The locations of the markings would be based on the placement guide
provided
by Impact Hobby and on an excellent photo of the actual aircraft
(above)
provided by Dave Gorman, whose father was also a Corsair mechanic in
the
VMF-225 squadron.
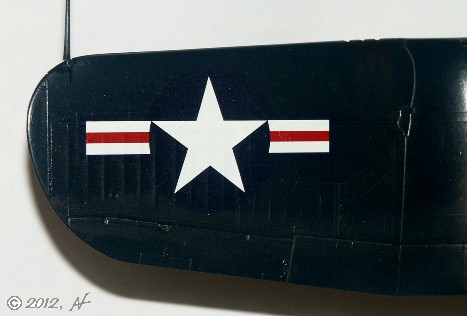
Heeding the
advice of more experienced modelers, no decal setting solution was used
because of the Future clear coat. This was a problem as the
decals
were prone to "silvering" where a layer of air gets trapped underneath
the decal and becomes visible through the clear carrier film.
|
Instead
of a decal setting solution, Future was brushed onto the model
before
laying a decal down. Once the decal was on, more Future was
brushed
on and gently removed with the edge of a paper towel. The decal
softened
and snuggled down onto the model like it would if a mild decal solvent
was used (see Fine Scale Modeler magazine, July 2010: Using Future
for
Decaling).
When dry, decal
edges were hard to pick out. The decals became bonded to the finish.
Applying
decals to a model has never been my greatest skill. Impact Hobby's
quality
decals and the Future clear-coat helped to produce a decaling
job
I'm very pleased with.
|
|
|

|
|
The model was
weathered with a wash of Model Master Flat Black to accentuate panel
detail.
The Future clear coat was unaffected by the thinned enamel
paint.
A final coat of Tamiya Clear (X-22) mixed with a small amount of Flat
Base
(X-21) was airbrushed on to give the model a satin finish.
The Parafilm canopy
mask was removed by carefully lifting off a corner with the tip of a
sharp
hobby knife and scraping the rest off with a fingernail. While not a
particularly
easy process, I find the Parafilm much easier to use and more effective
than other masking methods.
|
|

In
order to
display the plane "in flight," the kit's nicely detailed four-blade
propeller
just wouldn't do. Rather, I would simulate the look of a spinning
propeller
using a circular piece of clear plastic, my airbrush and Tamiya Smoke
(X-19),
a translucent grey paint.
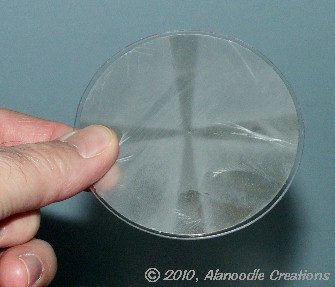
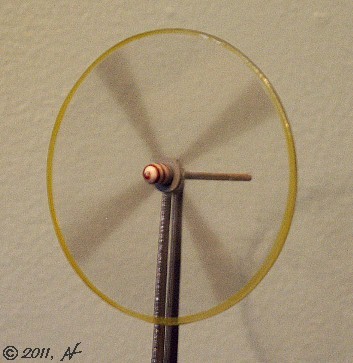
A 3
1/4 inch
diameter blank was cut from .040 inch thick clear copolyester sheet
using
an Olfa circle cutter chucked into a drill press and running
at the slowest speed. (Boys and girls, don't try this at home.) The
edge was rounded over slightly
with
a file.
|
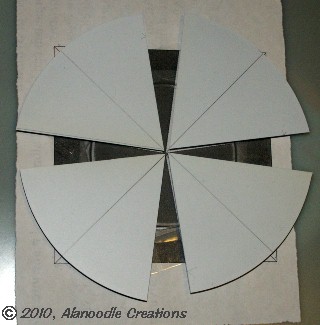
The blank was
taped down to a printed pattern like the one on the right which I
originally
created to get the same effect for my 1/144
scale P-51D model. The outer 1/16 inch of the blank was masked off
with Parafilm. Four pieces of styrene sheet were cut with 75°
angles
(strictly arbitrary) and taped down with a 5/16 inch (also arbitrary)
spacer
to hold the masks above the blank.
The blank was
then airbrushed with Tamiya Smoke. Because the sheet styrene masks were
placed above the blank instead of directly on it, the edges of the
painted
areas would be fuzzy instead of sharp to give the illusion of a motion
blur.
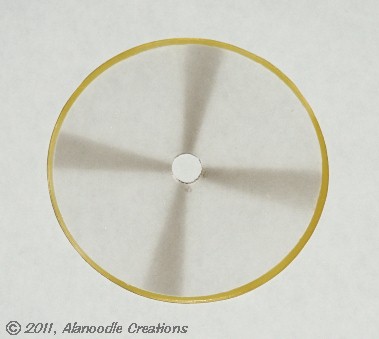
The blank was
removed from the template and the Parafilm was removed. A new mask was
then applied to the center of the blank covering all but the outer 1/16
of an inch and the outer edge of
the disk was sprayed with a 2:1 mix of Tamiya Clear Yellow (X-24) and
Yellow
(X-3).
|
|
 |
|
|
|
The mask was removed from the prop and the entire piece was finally
airbrushed
with Future floor polish. The clear disk, made from copolyester
had a funny property of causing the Future to bead up on its
surface. As a result, the first coat wasn't pretty. A second coat
covered a little better,
however, and a third coat, applied with a half-inch acid brush looked
very
good.
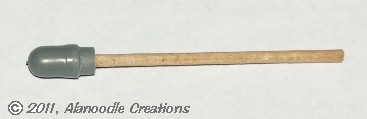
As for the kit's four-blade propeller, the blades were removed and the
remaining prop dome was super-glued to a prop shaft made from the
0.080
inch diameter wood stick from a cotton swab. By chucking the dome
and shaft in a hand drill and using it like a lathe, I was able to
shape the part with a small file, leaving a notch at
the back for the new propeller.
|
|
|
| The clear plastic
prop was then glued to a brass ship porthole which fit firmly onto the
notch cut into the dome. The prop center was painted medium gray and
the dome was
painted
gloss white.
The Impact Hobby
decal sheet includes a straight red line to represent a red spiral
painted
on the dome. This works well until the stripe reaches the
hemispherical
front end where it refuses to follow the curve to the center. I trimmed
the decal and it was applied only on the straight sides and stopped
where the
dome curved in. The stripe's
color was matched with a 10:1 mix of Tamiya Flat Red and Clear Blue
(X-23)
and the spiral was hand-painted to the center.
A #46 drill
bit (0.081 inch diameter) held in a pin vise cut a hole in the plane's
engine where the propeller shaft fits snugly. I like the effect.
Strangely, to
this day, no one has ever asked me why the propeller blades are a
motion
blur but the red spiral on the dome appears static.
|
|
 |

As a
final weathering
touch, the engine cowling was masked off and exhaust streaks were
airbrushed
onto the sides of the fuselage using Tamiya Flat Black. Gunfire residue
("GSR" to you CSI fans) was airbrushed around and behind the
wing
gun ports using a 1:1 mix of Flat Black and Hull Red (XF-09).
To
simulate
the antenna wire that ran from the aircraft's tail to the mast on the
forward
fuselage, a small length of sprue, the "trees" that model kit parts
come
attached to, was heated and softened over a small candle flame and
stretched
into a long hair-thin plastic filament. It was held into position with
super glue.
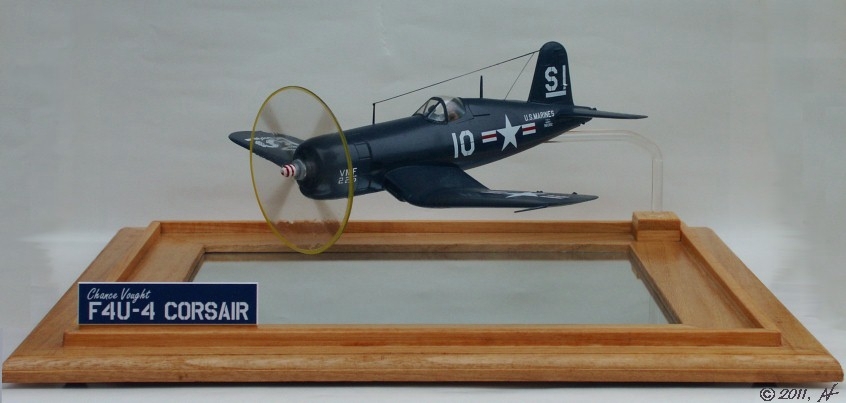
The model
is mounted
on a base made from a craft-store mirror with a basswood
frame.
The frame was modified with more basswood to hold the model and position a display plaque
and clear plastic cover from a Trumpeter display case. It was then stained and covered with spray-can
polyurethane.
A display plaque was engraved by Ed Dietrich of Andrew Lundy Associates
and was scanned to become the chapter header just over the photo of the
finished model, below.

|
The Corsair
took about 15 hours to build and paint. Many of the kits I've built
required
extra work just to correct engineering problems like bad part fit or
molding
issues. I was pleased with how easily this one went together. The
challenges
this model presented were mostly in the detailing, painting and
finishing
and actually helped to make this a very enjoyable project.
The model was
presented to my father on Fathers Day, 2011.
Special Thanks
to Dave Gorman for some excellent photos which helped to create a
historically
accurate model and as always, thanks to Sharon L. for being supportive
and putting up with my occasional single minded obsession with whatever
it is I happen to be obsessing about at the moment.
Click on the
picture of the finished model above to go to the F4U-4 Corsair Gallery
page.
|
In loving memory of Jack Nadel
|